Deploying Defender for Endpoint - Windows 10/11 & Windows Server


In this blog, we will walk through the different ways to deploy Defender for Endpoint, the difference in license feature & benefits, prerequisites and recommendations.
Licensing requirements.
- Defender for Endpoint P1
- Defender for Endpoint P2
- Defender for Servers
- Defender for Business
- Defender for Servers P1
- Defender for Servers P2
If you have the below licenses for your users, these will include Defender for Endpoint Licensing.
- Microsoft 365 E3 (Defender for Endpoint P1)
- Microsoft 365 E5 (Defender for Endpoint P2)
- Microsoft 365 E7 (Defender for Endpoint P2)
- Microsoft 365 Business Premium (Defender for business)
- Defender Suite addon for Business Premium (Defender for Endpoint P2)
- E5 Security suite addon for E3 (Defender for Endpoint P2)
Comparing Defender for Endpoint P1 vs P2 vs Business
| Feature | Defender for Business | Defender for Endpoint Plan 1 | Defender for Endpoint Plan 2 |
|---|---|---|---|
| APIs | ✔ | ✔ | ✔ |
| Attack surface reduction | ✔ | ✔ | ✔ |
| Automated investigation and remediation | ✔ | — | ✔ |
| Automatic attack disruption | ✔ | — | ✔ |
| Centralized management | ✔ | ✔ | ✔ |
| Cross-platform support (Mac, iOS/iPadOS, Android) | ✔ | ✔ | ✔ |
| Data retention (30 days advanced hunting / 6 months retention) | x | x | ✔ |
| Endpoint detection & response (EDR) | ✔ (optimized) | — | ✔ |
| Microsoft 365 Lighthouse (CSPs) | ✔ | ✔ | ✔ |
| Multitenant management | ✔ | ✔ | ✔ |
| Microsoft Threat Experts | — | — | ✔ |
| Monthly security summary reporting | ✔ | — | ✔ |
| Next-generation protection | ✔ | ✔ | ✔ |
| Server support | * | * | * |
| Simplified firewall & antivirus configuration (Windows) | ✔ | — | — |
| Threat analytics | ✔ (optimized) | — | ✔ |
| Vulnerability management (core capabilities) | ✔ | — | ✔ |
Deployment options
Connectivity type
Standard or Streamlined. Their is no difference to the end user, using either method and both methods are still fully supported and Microsoft has no plans to deprecate the standard URLs at this time. The below prerequisites must be met for the onboarding process to be successful.
Standard
- For standard commercial customers, they must allow outbound traffic to all the URLs containing WW and their geographic location. All the service URLs must be excluded from TLS inspection. For the .blob.core.windows.net URLs, only exclude the URLs specific to Defender for endpoint, do not exclude *.blob.core.windows.net. The URLs can be found in the below article.

Streamlined
- For streamlined connectivity method, your endpoints must meet the requirements listed in the below Microsoft article.

Deployment methods
For deploying Defender for Endpoint there are several methods available listed below.
- Microsoft Intune (Windows 10/11, iOS, MacOS, Android, and Linux) - This method is the most simplest and I highly recommend this method if you are already leveraging Intune.
- Local Script Installer - I only recommend this method for small deployments. Circa around 10 devices.
- GPO (Windows Server and Windows 10/11) - I recommend using this method for servers and only endpoints if not leveraging Intune. If devices are Hybrid joined, I recommend using the Intune method.
- SCCM - If your endpoints are using SCCM, this can be used for onboarding devices.
Defender for Servers
- Defender for servers is switched on via Defender for Cloud and is billed against your selected Azure subscription. Servers that are not running in Azure, either on-premise or in another cloud such as AWS will need to be onboarded to Azure ARC.
Deploying Defender for Endpoint
Now that we have gone through all the prerequisites, let get in to onboarding devices. The first method we will run through, is the most simple Microsoft Intune.
If you are migrating from another AV solution, I recommend onboarding devices with Defender in passive mode. When Defender detects a third-party AV solution on the device, it automatically falls in to passive mode unless forced. If you are going to run Defender along side another AV solution permanently, I recommend switching on EDR in block mode, however, this does require P2.
What are the differences between Defender for Endpoint in Active, passive, and EDR in Block mode?
For Defender for Endpoint to run in passive mode or EDR in block mode, endpoints must be onboarded to Defender.
| Feature | Active Mode | Passive Mode | EDR in Block Mode (MDE P2 only) |
|---|---|---|---|
| Real Time protection | ✔ | Enabled for DLP functionalities | x |
| Cloud Delivered Protection | ✔ | x | Required |
| Network Protection | ✔ | x | x |
| Attack surface reduction rules | ✔ | x | x |
| File scanning and detection information | ✔ | Limited | x |
| Threat Remediation | ✔ | x | ✔ |
| Security Intelligence updates | ✔ | Controlled via Windows Updates settings only | Controlled via Windows Updates settings only |
| Data Loss Prevention | ✔ | ✔ | ✔ |
| Controlled folder access | ✔ | x | x |
| Web Content Filtering | ✔ | Only works with Microsoft Edge | Only works with Microsoft Edge |
| Device Control | ✔ | ✔ | ✔ |
| PUA Protection | ✔ | x | x |
Microsoft Intune Defender Onboarding
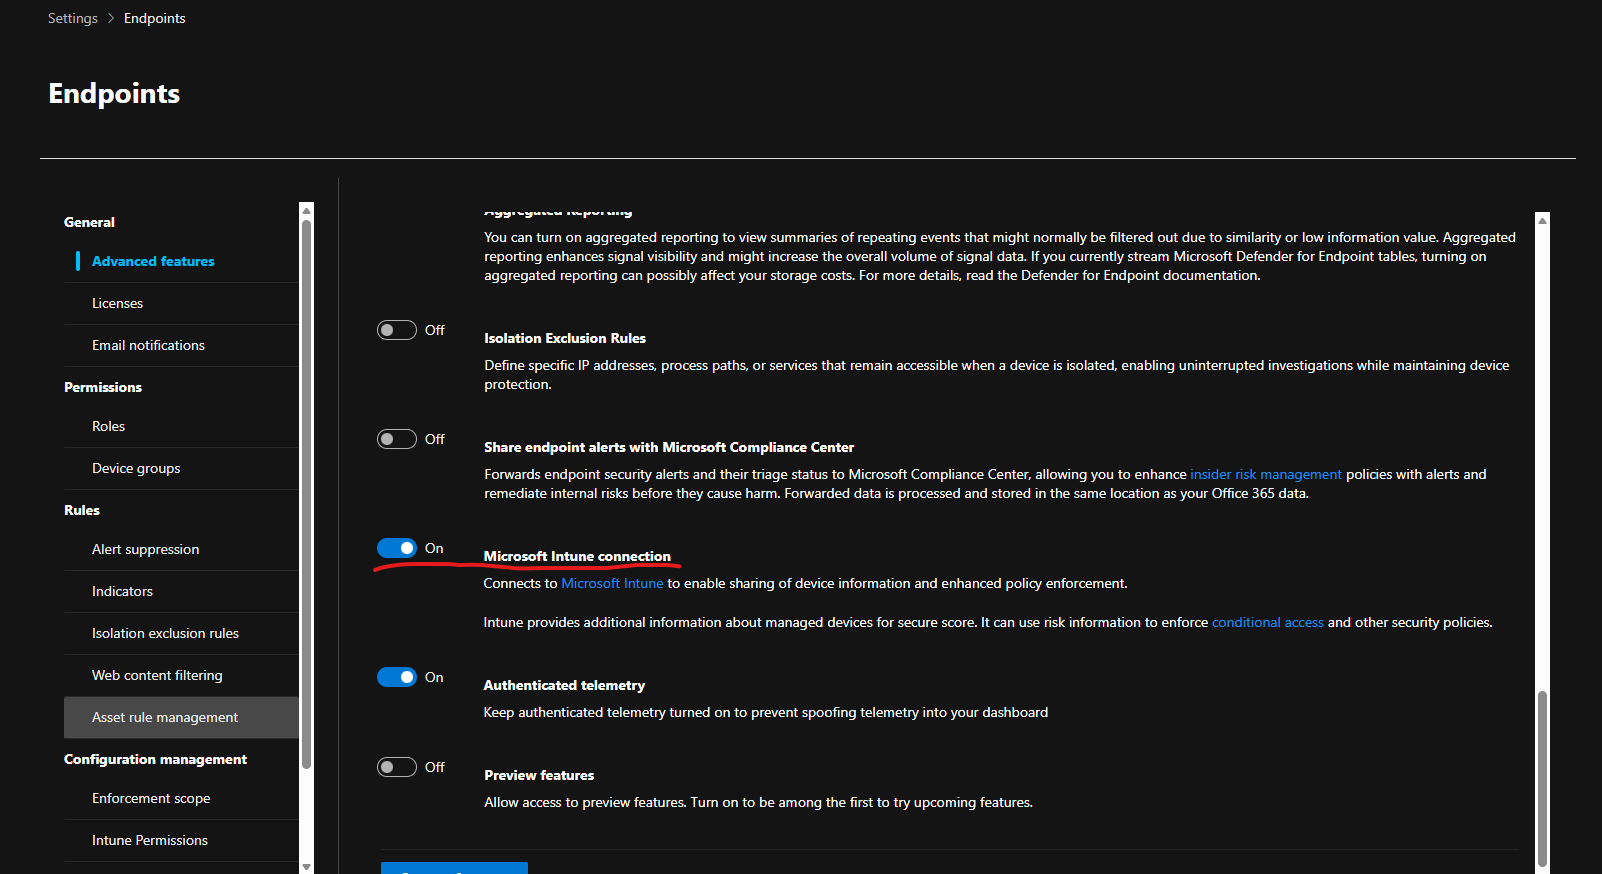
- Firstly, you need to enable the MDE integration connector with Microsoft Intune. You can do this by going to security.microsoft.com > System > Settings > Endpoints > Advanced Features, find the Microsoft Intune Connection and toggle it on. Make sure to Save preferences at the bottom.
- Now, head over to Intune.microsoft.com > Endpoint Security > Endpoint detection and response > Create Policy
Platform: Windows
Profile: Endpoint detection and response
Name: This can be anything you like for example, COMPANY-MDE-W11-Onboarding
Description: Anything
Microsoft Defender for Endpoint client configuration package type: Auto from connector (This uses the automatic Defender for Endpoint onboarding package).
Sample sharing: All (Default)
[Deprecated] Telemetry Reporting Frequency: Not configured.
Assignments: I recommend assigning this to a device group and using either all devices, or assigning to your dynamic group used for autopilot pre-provisioning. This way devices will be onboarded during the autopilot build.
I recommend creating a configuration profile, and enabling the, Oobe Enable Rtp And Sig Update policy. This enables Defender real-time protection and security intelligence updates are performed during autopilot provisioning.
When devices are onboarded to Defender for Endpoint, it can take some time for the devices to appear in the security.microsoft.com portal. I have seen this take anywhere between a few minutes to several hours. It also needs time to send all the device telemetry data to the security portal.